
Small dents, scratches, and holes are minor blemishes that can often be repaired with spackle or joint compound. However, if you see cracks in the wall or ceiling, it’s best to call a drywall specialist.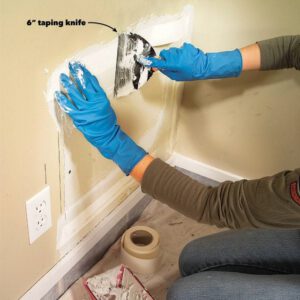
Cracks can signal serious structural problems and the need for professional repair. Fixing them yourself risks papering over the problem, which may return or worsen over time. For professional assistance, contact Drywall Repair Las Vegas now!
When it comes to patching up holes in drywall, there are plenty of options available. From the basics to something more extensive, almost all drywall patch kits come with the same goal: to create an undetectable effect that’s ready for painting. The differences between kits can be found in the types of supplies and tools included, whether or not the plaster and backing are pre-textured, and more.
The best drywall patch kits have a few important qualities in common: they are easy to use and capable of forming a durable surface that can be painted. This kit from 3M, for example, includes all the basic repair supplies you need to complete a drywall repair, including a sheet of sanding sponge and the appropriate sized sandpaper for the job. It also has a back plate that’s designed to flex and adhere, making it suitable for repairs over steel and wood studs.
Replacement Drywall
Drywall, or gypsum board, is an inexpensive, versatile building material used in walls and ceilings. Unfortunately, like many construction materials, it can be damaged by moisture and termites. This damage can range from sagging or warping to mold and mildew, or even worse. This type of damage often requires extensive repair or replacement work.
Depending on the size of the repair, it can take anywhere from an hour to a week or more to fix. This is especially true if you have to remove the damaged section of wall and replace it with an identical panel, or if you’re fixing large holes caused by plumbing leaks or storm damage.
Small drywall repairs, such as nail or screw hole patching, can be done with a simple spackle repair kit, which usually includes everything you need except paint. A drywall patch will need to be cut and installed in place, and then covered with joint compound before being sanded smooth and painted.
Hairline drywall cracks can be repaired with a thin layer of flexible crack filler, such as Good-Bye Cracks. This can be applied with a wide putty knife or a narrow utility knife and then sanded smooth. It’s important to note that these types of cracks can reappearate as the house settles, so you may need to apply more than one coat of repair product.
Nail pops are another common problem that can occur as the home settles, causing the nails that hold the drywall to the studs to twist and pull away from the wall, leaving behind a visible bulge. A quick fix for this is to simply tap the nail back in with a hammer, but for a more permanent solution, you should replace the nail with a drywall screw and then fill the hole with a dab of drywall mud.
If your drywall has been compromised by water or mold, you’ll need to call a drywall specialist. They’ll know the best course of action and how long it will take to remedy your drywall. They’ll also be able to spot potential issues that need to be addressed, such as the source of the moisture or the presence of mold, and help you get those taken care of immediately.
Drywall repair tools
The right drywall repair tools will make the job much easier. For starters, a good drywall saw is a must-have. It will let you cut out a damaged area quickly and efficiently without damaging the paper layer of drywall underneath. A drywall square is also a must-have, as it will help you mark the lines for cutting. In addition to a drywall saw and a square, you’ll need some sandpaper and a putty knife for filling in small holes and dents.
You should also consider buying a drywall taping tool. This is an essential drywall tool that will help you create smooth surfaces for painting and other home improvement projects. It will help you finish the edges of your drywall, and it can be used to apply a second coat of mud over tape. It is also a great option for repairing cracks and seams.
A good drywall repair kit will have everything you need for the job, including a selection of drywall patch sizes and different types of spackling paste. You’ll find kits that are geared towards people who are new to drywall and others that are more comprehensive and designed for homeowners who have experience hanging and finishing walls.
Holes in drywall happen quite frequently, and they can be caused by a number of things. You might hang something and forget to drive the nail back down, or someone might swing a door open with a lot of force and knock a hole in the wall. They can also occur in new construction as a result of damp framing that dries out and shrinks over time.
Nail holes and other small dents and scratches can be repaired using spackling. You can purchase a pre-mixed spackling compound from your local hardware store or builder’s supply center, but you can also make your own. To get the best results, use a narrow putty knife that’s designed for drywall repair rather than a general-purpose utility knife and apply it to the hole, blending it until it’s completely flush with the wall.
If you have a large hole or a crack in your drywall, you will need to apply reinforcing mesh before you spackle the area. This will prevent the spackling from becoming thin or crumbly as it dries. Large holes will require a larger application of spackling and may need a second or third coat.
Mold and moisture
Mold and moisture are common drywall issues. While you can’t prevent the spores that cause mold and mildew to grow, you can take steps to keep the problem from getting out of control. The most important thing to do is keep the drywall as dry as possible. Drywall absorbs moisture easily, and elevated moisture levels can compromise its strength and rigidity, making it more susceptible to damage and weakening. In addition, excess moisture promotes mold growth, which can cause health issues.
The first step in identifying potential drywall issues is to perform a physical inspection. Feel the drywall and push on it to see if there are any soft spots or areas. You may also notice that certain sections of a wall have a musty odor, which is a telltale sign of excessive humidity. You should also use a moisture meter to locate wet areas that are not immediately visible to the naked eye. These meters use thin pins to penetrate the surface of materials like drywall and wood to produce a reading.
If a wall has high moisture levels, it’s best to remove and replace the affected area. Drywall that has been exposed to moisture can lose its R-value and contribute to increased energy bills.
You can purchase a special type of drywall called mold-resistant drywall that is designed to reduce the chances of mold or mildew growth. Mold-resistant drywall has a thicker paper face and backing that are saturated with a waxy material that denies mold spores access to the paper. This is an especially good option for areas that are regularly used in damp conditions, such as bathrooms and laundry rooms.
Mold-killing primers are a great way to kill any remaining mold spores and help the drywall re-harden. Then you can apply a coat of paint that will create a fungicidal barrier to protect the drywall from mold spores and other stains. Lastly, you should set up a box fan to direct the flow of air to your walls. This will speed up the drying process and allow the drywall to achieve an acceptable level of moisture content.